excellent that!
-
Paul Woodhead posted in Omniversity
4 months ago Public -
-
-
-
Paul Owen commented on a post
-
Paul Owen commented on a post
-
Paul Woodhead commented on a post in Embedded Electronics - Arduino, etc
 Paul Woodhead6 days ago Public
Smart Soil - Grow Media
https://mididigi.com/esp32.html -
Paul Woodhead commented on a post in Raspberry Pi and Single Board Computers
Paul Woodhead6 days ago PublicSoil Intelligence System with ESP32
https://mididigi.com/esp32.html -
Paul Woodhead posted in Raspberry Pi and Single Board Computers
4 months ago PublicSoil Intelligence System with ESP32
https://mididigi.com/esp32.html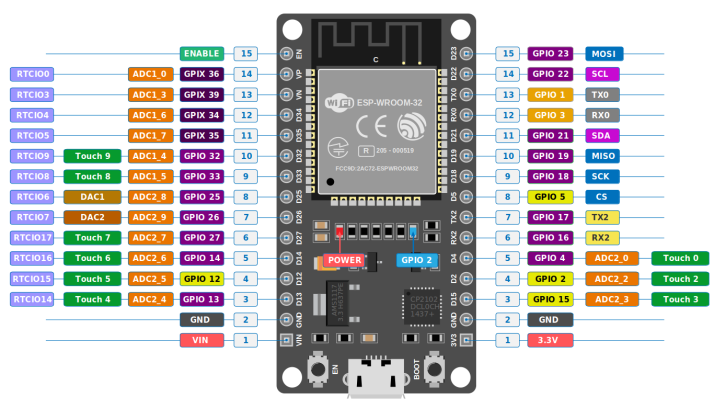
-
Paul Woodhead posted in Embedded Electronics - Arduino, etc
4 months ago PublicSmart Soil - Grow Media
https://mididigi.com/esp32.html
-
Paul Owen commented on a post
-
Paul Woodhead1 week ago PublicThere's a good tutorial about understanding Git here: https://mididigi.com/git.html
Thanks for this Paul i ll have a look at this!
-
Paul Owen commented on a post
-
Paul Woodhead posted in Code
4 months ago PublicThere's a good tutorial about understanding Git here: https://mididigi.com/git.html

-
Paul Woodhead commented on a post
-
Paul Woodhead posted in Embedded Electronics - Arduino, etc
1 year ago Public -
Paul Woodhead commented on a post in Embedded Electronics - Arduino, etc
Paul Woodhead1 year ago Public#include
// Define the sensor type and the pin it's connected to
#define DHTPIN 2 // DHT11 data pin connected to Arduino pin 2
#define DHTTYPE DHT11 // Define sensor type (DHT11 or DHT22)DHT dht(DHTPIN, DHTTYPE); // Create DHT object
void setup() {
Serial.begin(9600); // Initialize serial communication
dht.begin(); // Start the DHT sensor
Serial.println("DHT11 Humidity & Temperature Sensor");
}void loop() {
// Read temperature and humidity values
float humidity = dht.readHumidity();
float temperature = dht.readTemperature(); // Celsius// Check if readings are valid
if (isnan(humidity) || isnan(temperature)) {
Serial.println("Failed to read from DHT sensor!");
return;
}// Print values to Serial Monitor
Serial.print("Humidity: ");
Serial.print(humidity);
Serial.print(" %\t");Serial.print("Temperature: ");
Serial.print(temperature);
Serial.println(" °C");delay(2000); // Wait 2 seconds before taking next reading
}Tutorial: Humidity Sensor with Arduino Uno
Components Required:
Arduino Uno
DHT11 Humidity and Temperature Sensor (or DHT22 for better accuracy)
10kΩ Resistor (if using a DHT sensor without a breakout board)
Jumper wires
Breadboard (optional)
Wiring Diagram (DHT11 to Arduino)
DHT11 Pin Arduino Uno Pin
VCC 5V
Data Digital Pin 2
GND GND
If your DHT sensor doesn't have an internal pull-up resistor, connect a 10kΩ resistor between the VCC and Data pin.Step 1: Install DHT Library
Before writing the code, install the required library:Open Arduino IDE.
Go to Sketch → Include Library → Manage Libraries.
Search for DHT sensor library by Adafruit and install it.
Install Adafruit Unified Sensor Library as well.
Step 2: Arduino Code
Here’s the code to read humidity and temperature data from the DHT11 sensor and display it on the Serial Monitor.cpp
Copy
Edit
#include// Define the sensor type and the pin it's connected to
#define DHTPIN 2 // DHT11 data pin connected to Arduino pin 2
#define DHTTYPE DHT11 // Define sensor type (DHT11 or DHT22)DHT dht(DHTPIN, DHTTYPE); // Create DHT object
void setup() {
Serial.begin(9600); // Initialize serial communication
dht.begin(); // Start the DHT sensor
Serial.println("DHT11 Humidity & Temperature Sensor");
}void loop() {
// Read temperature and humidity values
float humidity = dht.readHumidity();
float temperature = dht.readTemperature(); // Celsius// Check if readings are valid
if (isnan(humidity) || isnan(temperature)) {
Serial.println("Failed to read from DHT sensor!");
return;
}// Print values to Serial Monitor
Serial.print("Humidity: ");
Serial.print(humidity);
Serial.print(" %\t");Serial.print("Temperature: ");
Serial.print(temperature);
Serial.println(" °C");delay(2000); // Wait 2 seconds before taking next reading
}
Step 3: Upload and Run
Connect the Arduino Uno to your computer using a USB cable.
Open the Arduino IDE.
Paste the code into the IDE.
Select Arduino Uno as the board (Tools → Board → Arduino Uno).
Select the correct COM port (Tools → Port → Select the right port).
Click Upload.
Open the Serial Monitor (Tools → Serial Monitor) and set the baud rate to 9600.
You should now see humidity and temperature values displayed every 2 seconds.Next Steps
Display data on an LCD: You can use a 16x2 LCD with I2C to display readings.
Use an OLED Display: Interface with an OLED screen (SSD1306) for graphical display.
Trigger an Alert: Use a buzzer or LED if humidity/temperature crosses a threshold.
Would you like additional features like data logging or Wi-Fi connectivity (ESP8266/ESP32)? 🚀
Tutorial: Humidity Sensor with Arduino Uno
Components Required:
Arduino Uno
DHT11 Humidity and Temperature Sensor (or DHT22 for better accuracy)
10kΩ Resistor (if using a DHT sensor without a breakout board)
Jumper wires
Breadboard (optional)
Wiring Diagram (DHT11 to Arduino)
DHT11 Pin Arduino Uno Pin
VCC 5V
Data Digital Pin 2
GND GND
If your DHT sensor doesn't have an internal pull-up resistor, connect a 10kΩ resistor between the VCC and Data pin.Step 1: Install DHT Library
Before writing the code, install the required library:Open Arduino IDE.
Go to Sketch → Include Library → Manage Libraries.
Search for DHT sensor library by Adafruit and install it.
Install Adafruit Unified Sensor Library as well.
Step 2: Arduino Code
Here’s the code to read humidity and temperature data from the DHT11 sensor and display it on the Serial Monitor.cpp
Copy
Edit
#include// Define the sensor type and the pin it's connected to
#define DHTPIN 2 // DHT11 data pin connected to Arduino pin 2
#define DHTTYPE DHT11 // Define sensor type (DHT11 or DHT22)DHT dht(DHTPIN, DHTTYPE); // Create DHT object
void setup() {
Serial.begin(9600); // Initialize serial communication
dht.begin(); // Start the DHT sensor
Serial.println("DHT11 Humidity & Temperature Sensor");
}void loop() {
// Read temperature and humidity values
float humidity = dht.readHumidity();
float temperature = dht.readTemperature(); // Celsius// Check if readings are valid
if (isnan(humidity) || isnan(temperature)) {
Serial.println("Failed to read from DHT sensor!");
return;
}// Print values to Serial Monitor
Serial.print("Humidity: ");
Serial.print(humidity);
Serial.print(" %\t");Serial.print("Temperature: ");
Serial.print(temperature);
Serial.println(" °C");delay(2000); // Wait 2 seconds before taking next reading
}
Step 3: Upload and Run
Connect the Arduino Uno to your computer using a USB cable.
Open the Arduino IDE.
Paste the code into the IDE.
Select Arduino Uno as the board (Tools → Board → Arduino Uno).
Select the correct COM port (Tools → Port → Select the right port).
Click Upload.
Open the Serial Monitor (Tools → Serial Monitor) and set the baud rate to 9600.
You should now see humidity and temperature values displayed every 2 seconds.Next Steps
Display data on an LCD: You can use a 16x2 LCD with I2C to display readings.
Use an OLED Display: Interface with an OLED screen (SSD1306) for graphical display.
Trigger an Alert: Use a buzzer or LED if humidity/temperature crosses a threshold.
Would you like additional features like data logging or Wi-Fi connectivity (ESP8266/ESP32)? 🚀 -
Paul Woodhead posted in Embedded Electronics - Arduino, etc
1 year ago Public#include
// Define the sensor type and the pin it's connected to
#define DHTPIN 2 // DHT11 data pin connected to Arduino pin 2
#define DHTTYPE DHT11 // Define sensor type (DHT11 or DHT22)DHT dht(DHTPIN, DHTTYPE); // Create DHT object
void setup() {
Serial.begin(9600); // Initialize serial communication
dht.begin(); // Start the DHT sensor
Serial.println("DHT11 Humidity & Temperature Sensor");
}void loop() {
// Read temperature and humidity values
float humidity = dht.readHumidity();
float temperature = dht.readTemperature(); // Celsius// Check if readings are valid
if (isnan(humidity) || isnan(temperature)) {
Serial.println("Failed to read from DHT sensor!");
return;
}// Print values to Serial Monitor
Serial.print("Humidity: ");
Serial.print(humidity);
Serial.print(" %\t");Serial.print("Temperature: ");
Serial.print(temperature);
Serial.println(" °C");delay(2000); // Wait 2 seconds before taking next reading
}Tutorial: Humidity Sensor with Arduino Uno
Components Required:
Arduino Uno
DHT11 Humidity and Temperature Sensor (or DHT22 for better accuracy)
10kΩ Resistor (if using a DHT sensor without a breakout board)
Jumper wires
Breadboard (optional)
Wiring Diagram (DHT11 to Arduino)
DHT11 Pin Arduino Uno Pin
VCC 5V
Data Digital Pin 2
GND GND
If your DHT sensor doesn't have an internal pull-up resistor, connect a 10kΩ resistor between the VCC and Data pin.Step 1: Install DHT Library
Before writing the code, install the required library:Open Arduino IDE.
Go to Sketch → Include Library → Manage Libraries.
Search for DHT sensor library by Adafruit and install it.
Install Adafruit Unified Sensor Library as well.
Step 2: Arduino Code
Here’s the code to read humidity and temperature data from the DHT11 sensor and display it on the Serial Monitor.cpp
Copy
Edit
#include// Define the sensor type and the pin it's connected to
#define DHTPIN 2 // DHT11 data pin connected to Arduino pin 2
#define DHTTYPE DHT11 // Define sensor type (DHT11 or DHT22)DHT dht(DHTPIN, DHTTYPE); // Create DHT object
void setup() {
Serial.begin(9600); // Initialize serial communication
dht.begin(); // Start the DHT sensor
Serial.println("DHT11 Humidity & Temperature Sensor");
}void loop() {
// Read temperature and humidity values
float humidity = dht.readHumidity();
float temperature = dht.readTemperature(); // Celsius// Check if readings are valid
if (isnan(humidity) || isnan(temperature)) {
Serial.println("Failed to read from DHT sensor!");
return;
}// Print values to Serial Monitor
Serial.print("Humidity: ");
Serial.print(humidity);
Serial.print(" %\t");Serial.print("Temperature: ");
Serial.print(temperature);
Serial.println(" °C");delay(2000); // Wait 2 seconds before taking next reading
}
Step 3: Upload and Run
Connect the Arduino Uno to your computer using a USB cable.
Open the Arduino IDE.
Paste the code into the IDE.
Select Arduino Uno as the board (Tools → Board → Arduino Uno).
Select the correct COM port (Tools → Port → Select the right port).
Click Upload.
Open the Serial Monitor (Tools → Serial Monitor) and set the baud rate to 9600.
You should now see humidity and temperature values displayed every 2 seconds.Next Steps
Display data on an LCD: You can use a 16x2 LCD with I2C to display readings.
Use an OLED Display: Interface with an OLED screen (SSD1306) for graphical display.
Trigger an Alert: Use a buzzer or LED if humidity/temperature crosses a threshold.
Would you like additional features like data logging or Wi-Fi connectivity (ESP8266/ESP32)? 🚀
Tutorial: Humidity Sensor with Arduino Uno
Components Required:
Arduino Uno
DHT11 Humidity and Temperature Sensor (or DHT22 for better accuracy)
10kΩ Resistor (if using a DHT sensor without a breakout board)
Jumper wires
Breadboard (optional)
Wiring Diagram (DHT11 to Arduino)
DHT11 Pin Arduino Uno Pin
VCC 5V
Data Digital Pin 2
GND GND
If your DHT sensor doesn't have an internal pull-up resistor, connect a 10kΩ resistor between the VCC and Data pin.Step 1: Install DHT Library
Before writing the code, install the required library:Open Arduino IDE.
Go to Sketch → Include Library → Manage Libraries.
Search for DHT sensor library by Adafruit and install it.
Install Adafruit Unified Sensor Library as well.
Step 2: Arduino Code
Here’s the code to read humidity and temperature data from the DHT11 sensor and display it on the Serial Monitor.cpp
Copy
Edit
#include// Define the sensor type and the pin it's connected to
#define DHTPIN 2 // DHT11 data pin connected to Arduino pin 2
#define DHTTYPE DHT11 // Define sensor type (DHT11 or DHT22)DHT dht(DHTPIN, DHTTYPE); // Create DHT object
void setup() {
Serial.begin(9600); // Initialize serial communication
dht.begin(); // Start the DHT sensor
Serial.println("DHT11 Humidity & Temperature Sensor");
}void loop() {
// Read temperature and humidity values
float humidity = dht.readHumidity();
float temperature = dht.readTemperature(); // Celsius// Check if readings are valid
if (isnan(humidity) || isnan(temperature)) {
Serial.println("Failed to read from DHT sensor!");
return;
}// Print values to Serial Monitor
Serial.print("Humidity: ");
Serial.print(humidity);
Serial.print(" %\t");Serial.print("Temperature: ");
Serial.print(temperature);
Serial.println(" °C");delay(2000); // Wait 2 seconds before taking next reading
}
Step 3: Upload and Run
Connect the Arduino Uno to your computer using a USB cable.
Open the Arduino IDE.
Paste the code into the IDE.
Select Arduino Uno as the board (Tools → Board → Arduino Uno).
Select the correct COM port (Tools → Port → Select the right port).
Click Upload.
Open the Serial Monitor (Tools → Serial Monitor) and set the baud rate to 9600.
You should now see humidity and temperature values displayed every 2 seconds.Next Steps
Display data on an LCD: You can use a 16x2 LCD with I2C to display readings.
Use an OLED Display: Interface with an OLED screen (SSD1306) for graphical display.
Trigger an Alert: Use a buzzer or LED if humidity/temperature crosses a threshold.
Would you like additional features like data logging or Wi-Fi connectivity (ESP8266/ESP32)? 🚀
Please log in or sign up to comment. -
Paul Woodhead posted in Raspberry Pi and Single Board Computers
1 year ago Public -
Paul Woodhead posted in Raspberry Pi and Single Board Computers
1 year ago Public
Please log in or sign up to comment.